Showing posts with label organizing. Show all posts

Wednesday, June 5, 2024

Somehow, It's June - Studio Update!

Well, hello there! 

Yes...  it's been a while since I've dusted off Ye Olde Blog here, but let's not dwell on that.  

I have been BUSY in the studio and here are just a few things I've been working on.  

First up, this Arabian presentation set that is very nearly finished.  It will be a sales piece and I hope to have it available soon, maybe next week.


I've got several other presentation sets underway.  Some I had started years ago, others are much more recent.  One step that many of them were stuck at were the chain parts, such as the noseband and lead chain.  So I recently made a batch of those pieces.  Here they are underway.


I tend to make things in batches.  I find it easier, once I'm in the groove, and have the supplies and tools at hand, to make several things at once.  

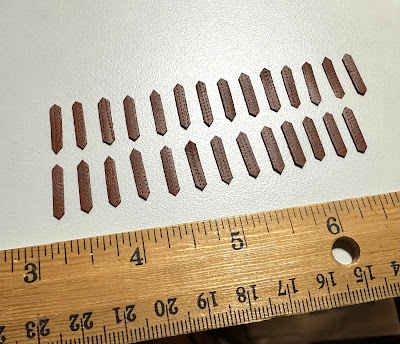
Today I did it with some small pieces of leather lace scrap that I'd put aside with a post-it note saying they could be keepers or... something else (a secret for now).  I went with the something else.  The plan was to cut out a few to test the idea, but then I kept going until I cut up all of the scrap in this little pile.  


I'm SO happy with how those little things came out and I'm looking forward to making my planned project with them - and sharing it!  It's also cool that I have a solid use for little pieces of leather lace scrap now.

Recently, I finished another idea I'd had for a bit now.  My tack desk sits in a corner of my studio room and I wanted to make some strips of hooks on the two walls to hold supplies, projects in progress, and finished pieces. 

First, I took some measurements and then cut some strips of aspen wood with my laser.


I also used the laser to draw on where I wanted the hooks to go, which is a super easy way to make sure they're evenly spaced and straight.

To put the hooks on, I thought I might have to pre-drill the holes.  However, the aspen wood is soft (one reason it's handy to use for certain projects, and the hooks have sharp points on the screw end.  So, I was able to screw them in by hand fairly easily.    


Then, I put command strips on the backs of the strips and stuck a couple of them on the walls around my tack desk.

One went above my tool holder and, so far, it's holding mostly finished halters, on the right side.  (Shameless plug, these are currently available in my Etsy shop).  


The other, longer one, went on the left side, closer to where I sit.  Here, I've started hanging up sets of tassels (you can see the turquoise ones that are now on that presentation set I mentioned up above).  There are also a handful of braided ropes, for reins or leads, and a few pieces of leather lace to finish projects next on deck to be worked on.  


I'm already REALLY liking these hook strips.  

Over on my YouTube channel, I've done a few more unboxing videos.  Also, I've experimented with something brand new: video game streaming.  I've gone Live three times, so far, playing Minecraft, and then World of Warcraft.  It was a lot of fun, even if only a few people were watching- ha!  Plans are in place to do more of this, though I may create a separate channel for those shenanigans.  It's been a good test of equipment and software, as I'd like to branch into live streaming some studio things, too.

Most recently, just yesterday, I filmed a double unboxing video aaaand, the return of my vlog


So if you'd like to hear even more about what I've got going on, check it out!  Be warned, it's 33 minutes long.  As a YouTube watcher, I find I actually like watching longer videos, since I often watch while I'm working on things and I can just watch/listen along.  I'd like to do a combination of longer and shorter videos on my channel.  Ya know, something for everyone. 

If you have something you'd like me to blog, or vlog, or make a video, about, please let me know!   

For now, I'm going to wrap this up and get back to work.  

Oh, and I got a new respirator.  Ain't it a 'beaut??


Saturday, January 20, 2024

Enjoying the Possibilities

I have this thing that happens in my brain sometimes.  It feels like an explosion of ideas, good feelings, excitement, hope.  It's happened a few times today.

For a good chunk of the afternoon and evening, I was chipping away at the continuing efforts to get my studio set up just right.  Also getting set to make more things.  I’m currently sold out of leather halters (SO happy about that) and I have many custom horses waiting for me to return to them. 

Plus:

BreyerWest is coming.

I have big plans for that, of course I do. 

Today there was a lot of enjoying the possibilities going on as I unpack more supplies and work on a bit more organization, before I settle in to get some work done.

I thought I’d share a glimpse at some of the fun stuff I have to work with and to work on.  Look at all of the possibilities!  Chaotic as it may seem, this really is my happy place.  ðŸ˜Š


Friday, April 6, 2018

Prep ALL The Things!!

Hang on, a quick note here: I'm sure you've seen an "ALL the things!" reference before.  What you might not know is the origin of it, or in particular the "crazed" artwork that often goes with it.  The source would be the hilarious blog, Hyperbole and a Half.  In particular:  "This is Why I'll Never be an Adult".  Many, MANY people have made their own "____ ALL the things!!" memes, with her artwork from that panel or an edited version, but often I don't see credit given, so I had to be sure and do it here. 

Okay, moving on...

-----------------------------------------


Prepping is not something I enjoy.  To use a drastic custom horse for an example: I absolutely love the repositioning part, most of the sculpting, and the finish work.  But not so much the tedious (and oh so very necessary) prepping part in between. 

I think my dislike of it is two fold.  One: I'm often impatient to get to the painting part, and two: I'm a perfectionist (ugh), so it feels like a job that is never really done.  I just have to find that elusive "good enough" stopping point.  (which is why deadlines are helpful - I can't pick away at a horse for years if I've only got a week...  or a day...  to paint it!)  ;-)

For some reason, since the Australia trip, I've been on a massive prepping spree.  I've been scraping, sanding, and primering (priming?  eh, you know what I mean) a big heard of OF SMs, skiving enough leather lace to outfit a whole herd in all sorts of strap goods, and finally sorting and prepping my collection of tack making hardware.  I pulled all of the Rio Rondo stuff off of the parts trees, sorted it into some GREAT new container boxes that I've found, and have been working my way through it all, filing off the burs. 


I'm trying to make the most of the odd desire to prep things, even though I think it might stem from a bit of anxiety that I'm having about my National Tack Month Project.  That is to make a set of racing tack for Black Caviar.  It's something I've never done before, but hey, that's the point of a challenge, right? 

I may also have a PILE of other tack by the time the month is up. 

After all, once I switch out of prep mode, I'll have a bunch of prepped stuff to make things with!

Tuesday, November 28, 2017

Prepping Parts

I've been working on a bit of tack parts prep lately.  Started by taking inventory of the straps I have made for Stablemate blankets and making some more of them.  I also moved them from a tiny organizer box into a larger storage option.  I have 4 of these boxes, that weren't being used.   


I found a new use for the former blanket strap organizer.  As of tonight it's now holding sets of hardware (slot rings, jump rings, and tongue buckles) for 8 halters.


Just in time, too.  A few days ago I prepped some kangaroo lace to build a halter! 


Friday, September 30, 2016

Floss Backstock Storage

Dealing with my (ever growing) floss hoard- er, "collection" haha - has been an ongoing thing and subject of a handful of posts here already.

Last summer, I launched into making my own bobbins and storing my floss in plastic "bead boxes", or so I call them.  I had seen that's how my Granny keeps hers, and thought it was an awesome idea!

So that's how I've kept most of it, save for colors that I have a lot of, which have been stored in their original packaging, for multipacks,


or in plastic pencil boxes, for the loose skeins.  As I used up a bobbin, I'd find another skein of that color, if I had one, and wind it on.

That system was working okay, until...

The Great Floss Acquisition of 2016, as it shall forever be known.  I added 935 skeins (in 250 colors) to the collection.  I wasn't quite sure how I was going to store them, but started by winding one of each color onto my recycled bobbins and integrating them into the bead box system.  However, that still left me with several hundred skeins that were homeless.  I had sorted them into color groups, crammed into my pencil boxes and left it at that.

Until now.

First, after wondering if it was necessary - and finally deciding that it is - I started an inventory spreadsheet.  Until recently, I've done everything by color, the numbers on each skein don't mean much to me.  But I've been following some patterns lately (for things other than saddle pads designed in my brain)  and for those projects, the numbers ARE important.  I've had a couple of time consuming, frustrating sessions of digging through everything to see if I even have such and such number.  You'd think I'd have everything by now, but I don't!  I'm making due by using similar colors/numbers for the ones I'm missing and so far that's been fine.  I'm NOT looking to buy any more of this stuff for a good while.

An odd collection of random pencil boxes, crammed with floss, isn't a very useful solution.  And it would make doing inventory a nightmare (so far I've only inventoried my floss on bobbins).  So, a few days ago I was searching Pinterest (good ol' Pinterest..) for some ideas on how to deal with my backstock.

I settled on using this tutorial for inspiration and decided to give it a whirl.

The last few days I've been bagging the backstock skeins into snack bags, by number, or grouped with sequential numbers if I only have a couple of each, like 403 and 404 below.


Each has an index card, which I may write some information on later, or I might not, depending on how crazy I want to get with all of this.  They are mainly there to help keep a shape to the bag and not let things get all smooshed.


I quickly filled two plastic shoe boxes (all I had available) and..  I estimate I'm maybe only half way through.  Hmmm.


This morning, I went to the BX (base exchange) to check out their plastic shoe boxes.  They are a different design that the old ones I have, which vexed me, but I thought they were the only solution.  Unfortunately, they are even more tapered at the bottom and my snack floss bags won't even fit in them without significant smooshing (I took a bag of floss with me for size checking).

Next to the shoe boxes were these, the next largest size of plastic storage box.


Test bag indicated that they were way too big.  Sure, they'd fit in there, but a massive waste of space inside.  What to do?


It dawned on me to try standing them up.  Yes, that would work!  I can get two rows in each box with room for a divider and room to put the lid on.  Perfect!


So I bought two of these and I HOPE that alllll of the rest of the floss hoard will fit into them.  I also bought a roll of contact paper to line the bottoms, as per the tutorial.  I'm going to use some cardboard to make a divider.  Things might get fiddly until I get the boxes loaded - I don't want to permanently attach the divider I don't think.  But once the boxes are full, it should sit in there just fine between the rows I think.


The plan is to have additional dividers in the rows, by brand, and I'm thinking by number groups (100s, 200s, etc.) for the main batch -  which is Cosmo, a Japanese floss brand.

After everything is bagged by number, I'll add them into my inventory spreadsheet and then I should be good to go!

It may seem like a lot of work to get all of this sorted in such a way, but I think it will be well worth it when I don't have to spend so much time digging around to find such and such color and then determine how much of it that I have if working on a large project.

Wednesday, February 24, 2016

A Report From The Front

It's been almost a month since I declared war on "Resistance".  Shortly after that I decided that the start of the war would be to get everything organized and put away or gotten rid of...  Throughout, not just the studio, but... the entire house.  I've been making a lot of progress, off and on, but I was saving the studio for last, because it just seemed so daunting.  I wouldn't be surprised if that was ol' Resistance, shelling me to keep me out of my creative, happy place.

However, it's only in the past couple of days that I have charged in and made some huge progress in the organizational battles that are taking place within the studio.

Back in early June, the studio was an empty room.  I did a post about it and I mentioned the huge closet and cabinets in particular.  It was my hope that, and I quote: "they won't just end up crammed full of stuff and become a black hole full of supplies that I won't see until we move again..."

Well, that's pretty much what had happened, so far.

However, after two days I'm happy to share this:


A big chunk of the closet has now been turned into a crafting nook!

When I first starting putting this together yesterday, I planned to just store all of my paper crafting and jewelry making supplies here.  But I realized that I can actually pull out the keyboard tray on the PC cart and make things here if I want to.  Which goes back to one of my early ideas of wanting two work stations - one for horses and one for paper crafts.  Since both require quite a bit of paraphernalia and it can be a challenge to switch from pony mode to paper mode or vice versa.  So now, if I want to, I can build my paper projects right here and save my desk for horses, tack, etc.  

The base of it is a PC cart that Jeff decided he didn't want in the latest renovation of his set up in the office.  On top of that is a cool shelf that I just picked up in a thrift store last weekend - for $6.00!!  On top of, alongside, and under everything, are my assortment of plastic drawers and holders.  In this picture, I had put my bags of Bonsai soil underneath the cart, but have since pulled them out and instead put my sea glass, polished rock, and wine cork collection under there.  A lot of my rubber stamps are on the shelf unit, the rest are in the DVD shelf on the left.  Left of the whole setup are the precious "figurines" boxes.  Yep, my model horses.  That's about all that's left boxed up in the closet now, aside from a couple boxes of random stuff "to sort".

The result of moving all of my stamps and drawer units into the closet is...  a LOT of empty shelves!


I'm also happy to report that, very recently, I have discovered a material here that is plentiful, cheap, and sturdy.  And the laser cuts it like butter...  I think once the epic cleanup is done, it's about time for me to start building my shelf stalls and.... free the horses!!

:D

I can't wait.


Tuesday, December 1, 2015

Herbs, Spices, Paints

For a while now I've kept my paint on a lazy susan style holder.  I've been thinking of trying something else though, because it takes up a lot of room on my perpetually crowded desk.  It also ends up being just another place that I pile stuff when things get messy...


I've seen a lot of neat ideas for storing/displaying craft paint - particularly over on Pinterest.

When we were unpacking our household stuff here, we came across our spice rack and Jeff decided to throw it out.  All of the spices on it were old, so they were thrown away.  However, I laid claim to the wooden spice rack, thinking it would make a perfect paint holder.

It does!


It's been kicking around for a while, but last night I decided to finally put it into use.

My original idea for it was to hang it on the wall, just to the left of my desk.


However, I think I like it just were it is, tucked in on my desk.  It doesn't take up much room (certainly much less than the lazy susan) and this way my paints will be right in front of me when I'm sitting there.

I had also originally thought about painting it, but it matches my desk just the way it is, and who cares if my paint rack says "Herbs & Spices"...  ;)

In other studio room news, I'm going to be getting another DVD shelf, to use as a ribbon holder.  (the first one I bought is serving as a rubber stamp holder)  The cardboard box ribbon holder that I made is turning out to be rather flimsy and I think a proper shelf would be much better.

I'm slooowly getting the room squared away so hopefully I can MAKE more things in there.


Tuesday, September 29, 2015

Today... Rocked!

Last night I declared to Jeff:  "I want to spend all day tomorrow in my craft room and not come out until lunch, if you come home, and dinner if you don't."  I made good on that declaration, only leaving the studio to eat, make tea, and go to the bathroom, haha.  Now the sun is setting and it's time for me to share the day's adventures and creations.

I started off the day thinking I "should" make Christmas cards.  I'd like to send handmade cards this year and I'd also like to try and sell some of them here.  In the course of digging through my (bajillion) stamps, the Christmas ones weren't really speaking to me - at all.

Recently I noticed that on Etsy, they have a category for Artist Trading Cards.  That made me realize that it's been a looong time since I found out about those and made any.  They were fun and I've always meant to make more.  In fact, I have a few of the paper craft storage drawers holding blank ATCs and small scraps to use on them.

So here's what I worked on today, a pile of Artist Trading cards, with horses on them - of course.


I had everything I needed: coffee,


horses,


and some good music.


One valuable thing I had learned when I was in the stamping club was that stamping off the edges of the paper can achieve some beautiful results.  I guess I've always been a color-inside-the-lines or stamp-inside-the-borders kind of person, for that to be a surprise and something new.  Today I used the heck out of that idea.  There were horses galloping on and off the paper everywhere.


Time to color some horses!


At some point, this happened.


I got tired of digging and digging through the tattered box that the colored pencils have always lived in, so I dumped them on the floor.


I started thinking, how could I make them easier to use?  It always takes me way too long to find the colors I want with the way I've always done it (fishing through the box).  My head was filled with great ideas: I could put them into cups or jars, or... Oh!  I could make a holder for them, with compartments for each group of colors.  That would be fun, I should do that ---

About the time I was thinking that's what I would do, I reined myself in, reminding myself that I already had a project going on at that very moment.  I grabbed a couple of empty pencil boxes and tossed them in, loosely divided by colors.  At least  this way I can SEE them better.


Proud of myself for not charging off on an A.D.D. fueled pencil organizing crusade, I returned to coloring.

Here are the three ATCs that I finished today.  I liked the combination of a simple, happy statement, paired with a colorful herd of horses.  They were fun to make.


I stamped horses on several others and have some ideas for how to finish them, but that will be another day.

One organizational task that's been sorely needed is to deal with my ribbon and, now, washi tape.  I hadn't really bought or used washi tape before, but it is everywhere over here and usually much cheaper than in the States, so I've started picking up a few rolls here and there.  My usual ribbon storage has been to throw all of the spools in a drawer and then have to dig around to see what I have or find such-and-such color.  Something has to change, especially since I plan to start using a lot more of it in tack making and doing costumes too.

I gathered all the ribbon that I have, to see what I needed to store.


I went to my Craft Storage board on Pinterest; I knew I'd seen and saved some neat ribbon and washi tape storage ideas on there for just such an occasion.

I ended up liking this one, about how to make a washi tape holder from a cardboard box, and I used it as a starting point.  I decided to use the box that my newest bookshelf came in; it was deep enough and tall enough to hold all of my ribbon and tape, with room to grow.

Of course whenever there's a cardboard box, a cat tends to appear.


She "helped" during much of the construction, trying to get in the box at various stages and playing with the shreds of cardboard and paper that were produced.

Here's the holder that I made, with the first dowel on.  I still have to place the rest.  I think this is where I'll put it.  It's a good fit in this spot, it won't block the shelves and is close to my desk.


A closer look at the first row.  I'm thinking this box may be big enough to hold my ribbon, washi tape, and leather lace spools too.  That would be really cool.  I'm going to work on installing the rest of the dowels soon.


Next up was to try out a quick test of a photo show setup.  I think this was the best picture of the batch.  I still have lighting and footing issues to work out.  Please ignore the fact that my "model" is a partially prepped body...


I pulled out a micro mini to test out the setup.  I think it will work for them too, once I fine tune the lighting.


And last up, a couple of random fun pictures.  A doughnut place in the mall is getting into the Halloween spirit, including selling cream puffs in these funny monster boxes.  I saved the one that we had gotten over the weekend and I could't resist having a little bit of fun with it.

Run away!


Hmmm, that horse doesn't actually look too concerned...  how about this one?


Haha, yeah, I'm strange.  But it's fun.

Today rocked.


Wednesday, August 5, 2015

Taming the Floss Hoard

A couple of weeks or so ago, I started cranking out bobbins from cereal boxes.  That has been my primary creative task ever since.  Oh, I've been enticed by various other things I want to do and make, but so far I've stayed the course (unusual for me, haha) and here are the results so far.

When I started off, I was putting the bobbins in the box, organized by number.  


I decided I didn't like this, because: 1) I couldn't see the colors very well and 2) a lot of my floss is "off brand" and might not even have a number code to go with it.

So I changed early on to organizing by color and just making sure I wrote any identifying info (brand and number code or color) on top of each bobbin).


Much better.

Those were the ones I had wound before we made the big move.  Now, armed with a pile of cereal box bobbins, it was time to get to work.  First, I transformed this:


Into this:


Into the box!


One thing I've done for a while now is buy complete cross-stitch kits at thrift stores, for the supplies inside.  (Back in South Dakota, I had bought several large kits for as little as 50-99 cents each!)  A few of them are kits I might actually make and I keep them intact, but most are dismantled.  The fabric goes with the rest of my fabric, and the floss goes into my ever growing, messy floss stash.  No more!  (on the messy part)

Shortly after we arrived here, I found a large kit at the local thrift shop.

All of the floss that was included there has now been filed away.


And so it goes.  I now have a second box completely full after taking apart more of my thrift store kits, and I probably enough random floss still kicking around to fill a third box.  I'm finding this to be a good hot weather activity.  I can park myself in the coolest part of the house at any given time, or in front of a fan, and work away.

I think once I get ALL of it wound onto bobbins, I'll probably organize the whole mess by color.  Right now I have sort of a rainbow in each box, but I think it'd be better to have all the reds, all the blues, etc. together in the same box for future use.

My mind has also been working (always) on other things to do with floss, since it turns out I have SO much of it.  At the top of the list, aside from more saddle pads of course, is Arabian tack - something I've always wanted to do.  I've been doing a bit of research on presentation sets, halters, and native costumes.  If I get tired of winding bobbins, I'm thinking I may take a bit of a related break and try to start making some tassels.

Oooo, something shiny!  Sorry, there goes my brain, I'd better go after it.  ;)